Securing Your Homelab with Tailscale and Cloudflare Wildcard DNS
Use your domain name to access your homelab via Tailscale.

There are instances when you want to ensure that only you have remote access to specific areas of your homelab. In this post, we’ll explore how to leverage Tailscale, Traefik, and Cloudflare to establish a private and secure connection to your homelab services.
Cloudflare
Cloudflare API
To begin, we need to generate the necessary API keys with Cloudflare.
Go the API page and login with your Cloudflare Account.
Create a API Key on the link above.
- Select Create Token
- Select a template Edit zone DNS
- Make sure that the Permissions is set to Zone / DNS / Edit
- By Zone Resources you can select for which domain the API key will be used
- Select Continue to summary.
- Review the token summary. Select Edit token to make adjustments. You can also edit a token after creation.
- Select Create Token to generate the token’s secret.
Make sure to save this API Key, as it will be needed later in the setup process.
Cloudflare DNS Record
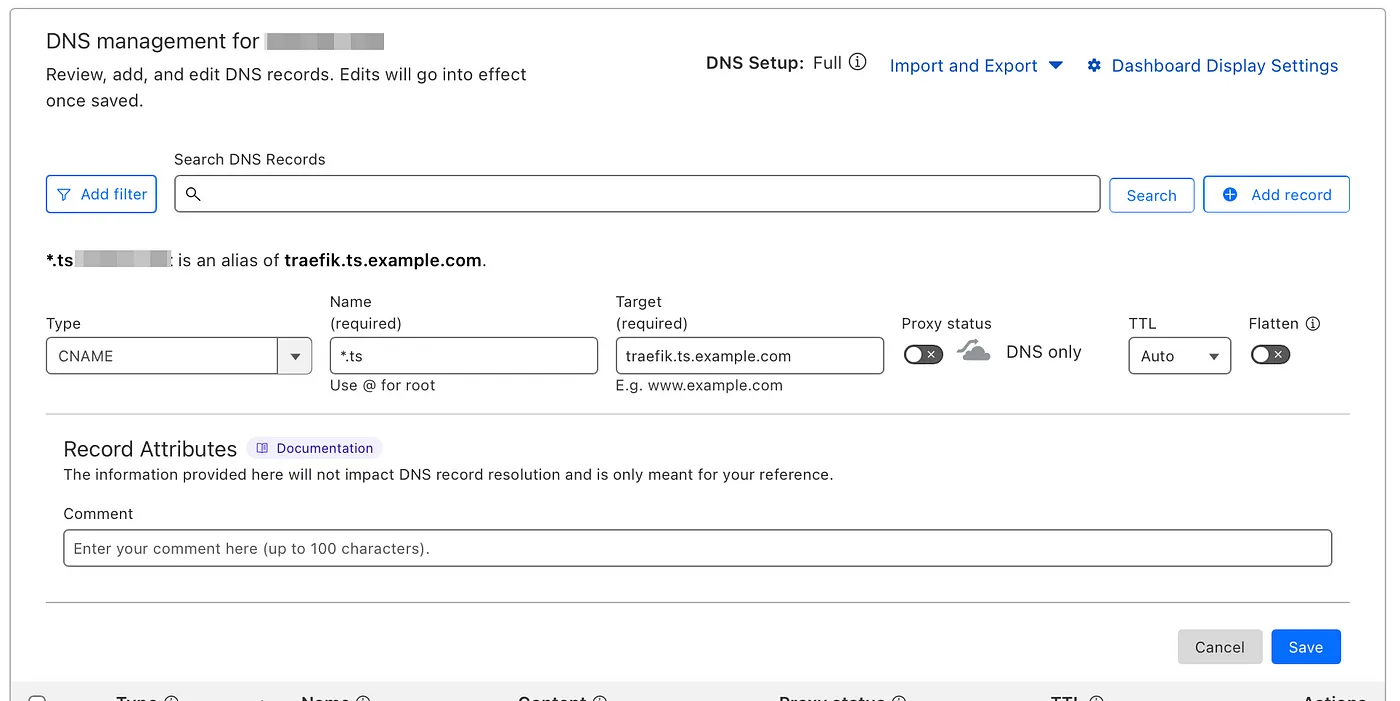
To differentiate between regular public domain names and those intended for use exclusively on Tailscale, we will create a wildcard DNS record in Cloudflare. This record will point to the Tailscale Traefik container, using a CNAME configuration.
Here’s how to set it up:
- In Cloudflare, navigate to your DNS settings for the domain you want to configure.
- Create a new CNAME record:
- Type : CNAME
- Name : *.ts.example.com
- Target : traefik.yourtailnet.ts.net
By setting up this wildcard record, any domain that ends with .ts.example.com will be routed to the Traefik container. This ensures that these domains are accessible only when connected to your Tailnet, eliminating the need to create individual DNS records for each specific domain name.
Tailscale Auth key
To generate an auth key for Tailscale, which will allow your Docker container to access your Tailnet, follow these steps:
- Open the Keys page in the Tailscale admin console.
- Click on Generate auth key.
- Fill out the form with the necessary details:
- Description : Enter a descriptive name for the key.
- Reusable : Specify whether the key can be reused.
- Expiration : Set a time frame for when the key will expire.
- Device Settings : Configure any specific device settings if needed.
- Click Generate key.
Make sure to save this Auth Key, as you will need it later for your Docker container setup.
Docker
To set up Tailscale and Traefik using Docker, you’ll create a docker-compose.yml` file that defines both services. Here’s a basic example of how to structure this file:
1
2
3
4
5
6
7
8
9
10
11
12
13
14
15
16
17
18
19
20
21
22
23
24
25
26
27
28
29
30
31
32
33
34
35
36
37
38
39
40
41
42
43
44
45
46
47
48
49
50
51
52
53
54
55
56
57
58
59
60
61
62
63
services:
  tailscale-traefik:
    image: tailscale/tailscale
    container_name: tailscale
    hostname: traefik
    environment:
      - TS_AUTHKEY=${TS_AUTHKEY}
      - TS_STATE_DIR=/var/lib/tailscale
      - TS_USERSPACE=false
    volumes:
      - ./tailscale-traefik/state:/var/lib/tailscale
      - /dev/net/tun:/dev/net/tun
    cap_add:
      - net_admin
      - sys_module
    restart: unless-stopped
  traefik:
    image: traefik
    container_name: traefik
    restart: unless-stopped
    security_opt:
      - no-new-privileges:true
    environment:
      - TZ=Europe/Amsterdam # Change this to your timezone
      - CF_API_EMAIL=${CF_API_EMAIL}
      - CF_DNS_API_TOKEN=${CF_DNS_API_TOKEN}
    depends_on:
      - tailscale-traefik
    network_mode: service:tailscale-traefik
    volumes:
      - /var/run/docker.sock:/var/run/docker.sock:ro # Docker socket to watch for Traefik
      - traefik-certs:/certs # Docker volume to store the acme file for the Certifactes
    command:
      # Tell Traefik to discover containers using the Docker API
      - --providers.docker=true
      - --providers.docker.exposedByDefault=false
      # Enable the Trafik dashboard
      - --api.dashboard=true
      # Set up LetsEncrypt
      - --certificatesresolvers.letsencrypt.acme.dnschallenge=true
      - --certificatesresolvers.letsencrypt.acme.dnschallenge.provider=cloudflare
      - --certificatesresolvers.letsencrypt.acme.email=${LE_EMAIL}
      - --certificatesresolvers.letsencrypt.acme.storage=/certs/acme.json
      # Set up an insecure listener that redirects all traffic to TLS
      - --entrypoints.web.address=:80
      - --entrypoints.web.http.redirections.entrypoint.to=websecure
      - --entrypoints.web.http.redirections.entrypoint.scheme=https
      - --entrypoints.websecure.address=:443
      # Set up the TLS configuration for our websecure listener
      - --entrypoints.websecure.http.tls=true
      - --entrypoints.websecure.http.tls.certResolver=letsencrypt
      - --entrypoints.websecure.http.tls.domains[0].main=${DOMAIN}
      - --entrypoints.websecure.http.tls.domains[0].sans=${SANS_DOMAIN}
    labels:
      - "traefik.enable=true"
      - 'traefik.http.routers.traefik.rule=Host(`traefik.ts.example.com`)'
      - "traefik.http.routers.traefik.entrypoints=websecure"
      - "traefik.http.routers.traefik.tls.certresolver=letsencrypt"
      - "traefik.http.routers.traefik.service=api@internal"
      - "traefik.http.services.traefik.loadbalancer.server.port=8080"
volumes:
  traefik-certs:
    name: traefik-certs
Don’t forget to change traefik.ts.example.com to your domain name.
To store sensitive information and configuration values, create a .env file in the same directory as your docker-compose.yml`.
1
nano .env
In this .env file place the following content.
1
2
3
4
5
6
7
CF_API_EMAIL=<Cloudflare email>
CF_DNS_API_TOKEN=<Cloudflare API Token>
TS_AUTHKEY=<Tailscale Auth Key>
LE_EMAIL=<Your email for LetsEncrypt>
DOMAIN=ts.example.com       # Your main domain
SANS_DOMAIN=*.ts.example.com # Your wildcard domain
This setup will allow you to securely access your applications hosted on your homelab through Tailscale, while Traefik handles routing and SSL termination.
Start Traefik and Tailscale
To launch your containers for Traefik and Tailscale, use the following command in your terminal:
1
docker compose up -d
Depending on your Tailscale configuration, you may need to approve the tailscale-traefik device in the Tailscale Admin Console. Log in to the Tailscale Admin Console to manage devices.
Once your Tailscale connection is established, you can access the Traefik dashboard at:
https://traefik.ts.example.com
Now that your setup is complete, any services you add to Traefik with a domain ending in *.ts.example.com will be accessible exclusively through your Tailnet. This adds a layer of security, ensuring that only authenticated users connected to your Tailnet can access your services.
Summary
By integrating Tailscale with Traefik, you’ve created a secure and streamlined way to manage access to your homelab services, while leveraging Docker for container management. Enjoy exploring and expanding your self-hosted environment!